Sunday, July 24, 2011

Blue & White Graduation Cake

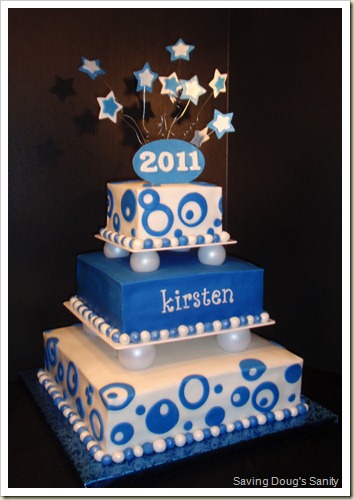
A graduation cake for about 100 people.  This cake is made of 14", 10" and 6" square cakes stacked.  I used plastic separator plates and the globe pillars from Wilton. All cakes were covered in fondant with LOTS of fondant balls for the border.  The topper is made from gumpaste.
20110723 Graduation

Wednesday, July 13, 2011

Just the cakes please....

I have recently created a page that shows photos of all my cakes.  Click on the "Just Cakes!" link under the Pages heading on the right hand side of my blog.  I will continue to update and will also work on linking the photos to their respective blog posts in the near future.  Unfortunately updates to this page do not show up in readers or RSS feeds.  Sorry.

Thanks for looking!

Saturday, July 2, 2011

Green M&M cake

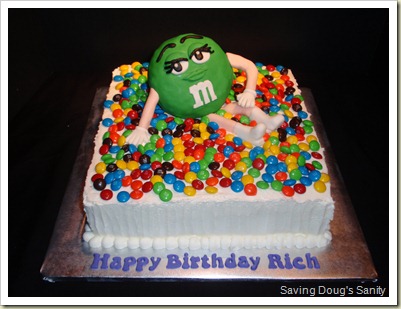
This was a fun cake!  Rich is a retired gentleman who collects M&M memorabilia.  His wife and I decided that the green M&M would be a perfect fit for his birthday cake. 

The body is made from RKT covered with fondant and fondant accents.  The arms and legs are lollipop sticks covered with fondant. 

20110429 green mm

Happy Birthday Rich!

Wednesday, June 8, 2011

A Golfer, a Swimmer and an American Doll

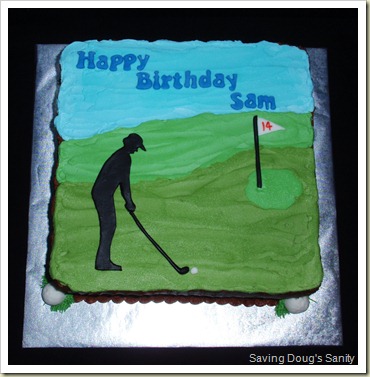
I had a request for 3 birthday cakes within 2 months for children of the same family.  We decided on 10" x 10" 3-layer cakes.  They requested one dimensional decor on the cakes so here's what I did...

2011041 Golf
Vanilla buttercream to create the field and sky. The golfer was cut out of black fondant. Small fondant golf balls at the bottom corners of the cake.

20110527 Swimming
Vanilla buttercream to create the "water".  Swimmer is cut from black fondant.

20110603 American Girl
This last one was the one I was most nervous about.  This is the American Doll Lanie in her nature outfit.  The face is what made me nervous.  Cartoon caracters, sure...but real people faces, terrifying!  It took a few tries but I think it turned out pretty good.  BTW - Kake was the birthday girl's nickname for Caroline.

By the time my co-worker picked up the last cake I said "you must be pretty sick of cake by now", he said "Never!"  Now that's what i  like to hear :)

Sunday, May 8, 2011

Daffodil Cake

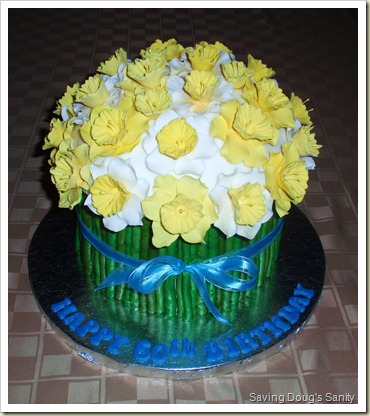
Whenever I see a cake design I like, I make sure to save it in an "idea" file that I have.  I've had this cake design saved for a while now...just waiting for the right occasion to make it.  I was asked to do a cake for a Mom turning 60.  I turned to my idea file and pulled out a few designs that I thought looked like "Mom" cakes.  This was the one that was chosen.  

It is an 8" round cake with a dome of rice crispy treats covered in fondant on top.  I decided to use fondant so I could "glue" the daffodils to it.  I was afraid if I just used buttercream that they would not stay on.  The flowers were made ahead of time out of gumpaste.  It took a little while to figure out how to make them but once I made a few I was in the groove.  I primarily used this tutorial from http://www.make-fabulous-cakes.com/gum-paste-daffodil.html to make the daffodils.  The stems were piped with a #12 round tip using green buttercream.  The ribbon is not edible.

20110324 Daffodil

Honestly, I'm not happy with how the white shows through between the flowers, and I haven't come up with a solution for this if I need to made this cake again.  However, "Mom" loved her cake and that's what counts!


Saturday, March 19, 2011

Now that's a Twinkie!

I'll admit I never really was a Twinkie girl.  My favorite was Ho Hos.  Gosh, I haven't had one of those in forever....mostly because we have no local Hostess distributors, so no Twinkies or Ho Hos to be found around here.  But ever since I started thinking about this cake all I want is a HO HO!

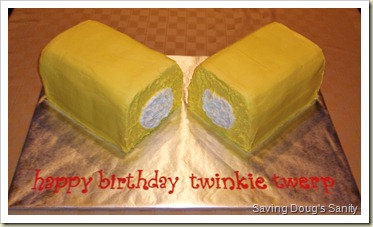
The request was for a Twinkie cake to feed about 40 people.  The most challenging part was scaling the dimensions so it looked like a Twinkie and not just a plain yellow cake.  I decided to show the Twinkie broken in half so the filling would show.  This Twinkie is about 7" wide, 5" tall, and 17" long!  I started with a 9" x 13' cake, cut it in half and rounded the tops.

20110310

Happy Birthday Twinkie Twerp!

In case you are wondering, Twinkie Twerp was a college nickname because the birthday girl was always craving Twinkies.

Wednesday, March 16, 2011

Super Mario Cake

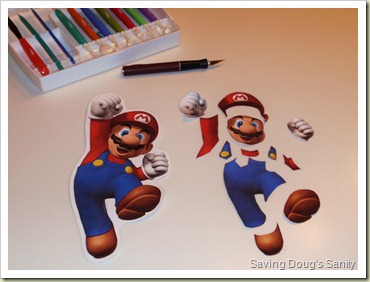
I found a great pose of Super Mario for a cake design.  I decided to do a flat fondant image on the top of the cake.  I started by printing out a few copies of the image.  The cut out made it easier for me to determine what size pan I wanted to use too.  I just had to lay the image on my different size pans to see which one looked best.    Then I cut one of the images into "puzzle" pieces.  Here I am ready to begin...

P3030048

Next I rolled out the colors of fondant I needed and placed a cut out piece on top.  I used an Exacto knife to cut around the piece.  Some of the pieces like the nose and eyebrows I just molded by hand.  I used my gumpaste tools to add "seams" to the pants and texture to his moustache.  After almost two hours I had put the fondant puzzle together! 

P3030050

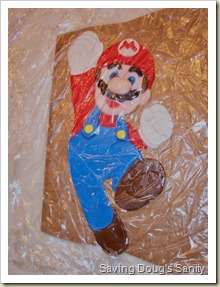
I made this a few days early so I just wrapped him between two pieces of cling wrap coated with crisco to keep him from drying out.  I also placed this into a ziploc bag.

P3030051

Two days later it was still pliable so I could easily place him on top of my cake.

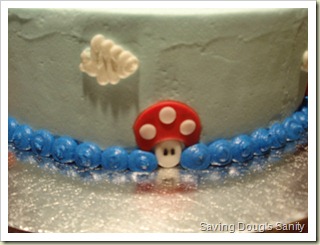
I had to come up with a design to add around the sides of the cake.  I wanted Mario to be the focus so I decided on a simple blue border with a few 1UP mushrooms.  I used different circle shape cutters to put this little guy together.

P3040061

Mario was looking a little lonely on top of the cake so I added a few clouds around him, he is jumping after all.  And here's the finished cake...

2011030 Super Mario 

Monday, March 14, 2011

My recent bargain purchase!


I was at my local HomeGoods store recently and found this great cake platter on the clearance rack for only $12!  After looking it over closely to make sure there were no chips or cracks and that it was level, it ended up in my cart!  I love it because it's white and the ribbon can be changed to match whatever you display on top.  How could I resist?

Saturday, March 12, 2011

Chocolate Tasting Party

I recently hosted a chocolate tasting party. It was a great time and a perfect get together to get rid of the winter blahs.  I based my party and menu from a book called Tasting Club by Dina Cheney.  This book is full of information and a great guide for hosting tasting parties including:  wine, chocolate, cheese, honey, tea, extra virgin olive oil, cured meats, balsamic vinegar, apples, and beer.

Our menu…

Appetizers

Croutes with Blue Cheese, Toasted Walnuts
and Port Wine Reduction
Manchego and Drunken Goat Cheese
with Quince Paste and Sea Salt Crackers
Dates Stuffed with Gorgonzola, Bacon and Chives
Opera Primo Muscato

Chocolate Tasting

Green and Black's Organic White Chocolate
Godiva Milk Chocolate
Green and Black's Organic Milk Chocolate
Ghirardelli Intense Dark Evening Dream
World Classics - Chocolate Obsession
Green and Black's Organic Dark Chocolate
Green and Black's Organic Dark Chocolate
Lindt Excellence A Touch of Sea Salt
Lindt Excellence Chili

Afterwards

Mini Dark Chocolate Cones w/Creme de Menthe Filling
Chocolate Covered Bacon w/Almonds
Chocolate Covered Espresso Beans

And for a finale...
Angelic Hot Chocolate!

A few of my guests brought dessert wines and we sampled them with our chocolates as well. We used baguette slices and clementines to cleanse our palates between tastings. I must say I never thought I would say this but "Wow, that was a lot of chocolate!"


A few random thoughts...

I'm glad we started with non-chocolate appetizers.  The strong flavors were a great prelude to the chocolate.

Nine chocolates were probably a little too much.  Because I didn't want to limit to just milk or just dark I chose the whole spectrum, from white to dark.  Next time I would focus on only milk, only dark, or something like only Swiss chocolate, and
probably limit to 6 chocolates. 

Directions on how to do a proper tasting and a place to record your notes is essential.  It really is amazing the differences you can notice in chocolate if you really pay attention.  For example, many of the chocolates tasted different if you let them melt on your tongue versus chewing them. 

The wrong pairing of wine with chocolate can be really bad.  Some of the wine and chocolate pairings were not so good.  The raspberry wine was OK with most of the chocolates, but definitely better with the dark chocolates.

Chocolate covered bacon...you either like it or you don't.  It goes along with the whole sweet and salty thing but it IS different.  I don't know if it would be my first choice but I'm glad I tried it.

Overall it was a great night...you can't go wrong with good friends and chocolate!

Sunday, February 27, 2011

Bonus Day Dessert Table

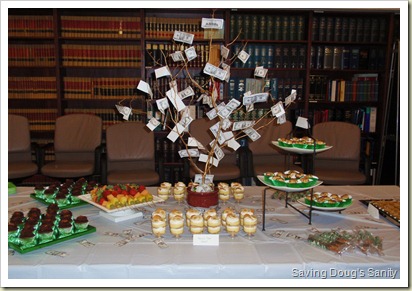
I was very happy with how my first dessert table turned out.  It was for a “Bonus Day” celebration at work, that’s why the money theme.    A co-worker made the money tree and I though she did an awesome job!  Here is what the overall table looked like…

P2220062The table included…

Fresh Fruit Skewers

P2220061

Chocolate Covered Pretzels

P2220063

Strawberry Pillows

P2220057

Baklava

P2220055

German Chocolate Cupcakes

P2220060

Banana Cream Parfaits 

  P2220058

Tuesday, February 15, 2011

Coming up….My First Dessert Bar

I have been seeing lots of wonderful photos of dessert bars lately. They seem to be growing in popularity, for weddings, birthday parties, and other theme parties.

Here are two blogs that show some great ideas and amazing work…


So when I was asked to prepare something for an upcoming celebration at work the first thing that came to mind was DESSERT BAR!

First I had to figure out how many items to make. After some searching I decided on 5 different desserts, three pieces per person. There will be about 50 people, so 150 pieces total.  Each piece will be an individual serving size.

The only thing I can’t decide on is where to have the chocolate. I’m trying to decide between a cupcake and a parfait. One will be fruit and the other chocolate.

Should I do a German chocolate cupcake and a banana cream parfait?

Or a lemon raspberry cupcake and a chocolate peanut butter parfait?

A chocolate peanut butter cupcake and a raspberry tiramisu?

You get the idea….decisions, decisions….

The next 7 days are going to be a busy because this event is the same day as I am hosting a Chocolate Tasting Party for my girlfriends. Stay tuned for the details on that event.  That reminds me...I think I need to make some lists of things to do!


Saturday, January 8, 2011

Honey Nutella Rice Krispy Treats

You must try these! 

Honey Nutella Rice Krispy Treats

I found this recipe on a blog that I follow www.cupcakeproject.com.  I made them a few days ago and they were wonderful!  They were also very easy.  The honey flavor was a touch overpowering for me so I think I may decrease the amount a bit next time I make them, but it did seem to mellow over the next day or so. 

I hope you enjoy them as much as I did!

Wednesday, January 5, 2011

Open Rose Patchwork Cutter

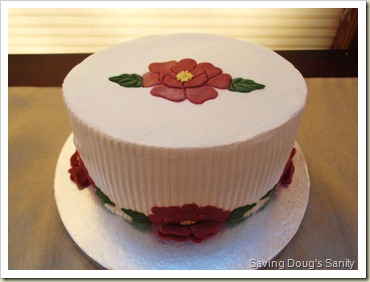
I ordered some cake goodies for myself for Christmas and one of the items was a patchwork cutter.  I have been looking at these for a while and decided to give it a try.  The cutter looks like this… OPEN ROSE
I purchased mine from Global Sugar Art.  I was originally going to use it as a stamp for brush embroidery but since the cake I was making was iced with buttercream I decided to use it as a cutter this time.  Hopefully I’ll have an occasion to use it as a stamp soon!
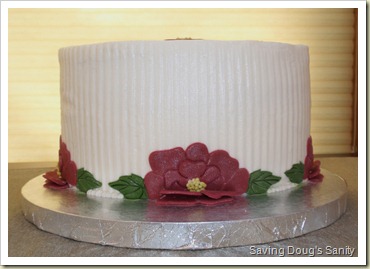
The cake was a small oval and I used a line impression mat on the sides to give it some interest.  I cut each flower out of fondant and dusted them with luster dust.  Then I placed one rose at the bottom on each side of the cake.  I was going to write Happy Birthday on the top because it was a birthday gift but I decided the single rose on top looked best.  Here is the finished product!
P1020211
Happy Birthday Betty!
And because I always take multiple pictures I thought I’d show you all the views…
P1020213
P1020218
P1020217
This cutter was very easy to work with and I can see multiple uses and lots of different styles that could be made with it.  Now I just need some time to play!

Monday, January 3, 2011

What is a Terrible Towel?

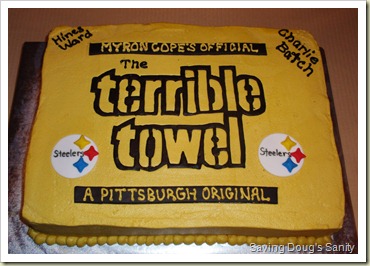
Sometimes I learn something new because of a cake request. For example I now know what a Terrible Towel is. It is associated with the Pittsburgh Steelers football team and was created in 1975 by radio broadcaster Myron Cope.  In 1996, Cope gave the rights to The Terrible Towel to the Allegheny Valley School in Coraopolis, Pennsylvania. The school provides care for more than 900 people with mental retardation and physical disabilities. Proceeds from the Terrible Towel have helped raise more than $3 million for the school.  Thank you Wikipedia.  But that's enough sports trivia for today...on to the cake.

Hunter wanted a Terrible Towel for his birthday.  Now a towel is a pretty easy thing to make.  The design ON the towel maybe not so much.  How was I going to do this and make it look right?  I decided to print out the logo of the terrible towel in the size I needed.  I rolled out some black fondant, placed the printout over the fondant and traced over the design with an exacto knife.  Time consuming but I think it turned out pretty cool.  When the lettering was "pressed" onto the cake it took on a puffy appearance (exactly what I was going for).  The rest of the design was fondant with buttercream piped lettering.  Now if I could just work on getting those square corners straighter, ugh.
20101209 terrible towel
Happy Birthday Hunter!