Friday, December 31, 2010

Cookie Exchange 2010 – The Cookies

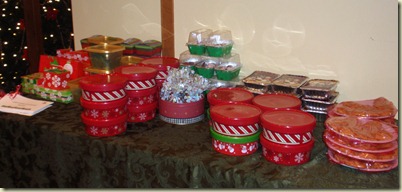
For my exchange I ask everyone to package up their cookies in small batches.  This makes it much less time consuming to exchange and you also get some nice containers to pack up and give away cookies for gifts.  Plus I think it’s a little more sanitary. PC140192 This year we presented the cookies one at a time for tasting.  Here is what we had…

Top row (L to R):  Grandma’s Ginger Cookies, Almond Cherry Bites, Mexican Chocolate Cookies, MoonBeam Cookies.PC150193 Bottom row (L to R):  Chocolate Snowballs, Eggnog Frosted Nutmeg Sugar Cookies, Pumpkin Cookies, Peanut Butter Blossoms, Chocolate Candy Cane Cookies.

Grandma’s Ginger cookies were a crunchy cookie great for dipping in tea or coffee! A traditional favorite.

Almond Cherry Bites –almonds, dried cherries and melted chocolate.  A gourmet presentation!

Red pepper in the Mexican Chocolate cookies complimented the bittersweet chocolate and left you saying “mmm, there’s the heat” with a smile.

MoonBeam cookies won the favorite cookie award of the night!  A sugar cookie with coconut and lemon filling.  Yummy!

The Chocolate Snowballs were hiding a secret.  Kisses inside.  The peppermint kisses were definitely a good choice!

Eggnog Frosted Nutmeg Sugar cookies – A sweet cookie that really brought home the holiday flavor.  Runner up for favorite cookie!

Pumpkin cookies were a soft, cakey cookie with sweet icing.  These would be great at Thanksgiving too!

Peanut Butter Blossoms – How can you go wrong with peanut butter and chocolate?

Chocolate Candy Cane cookies – A soft chocolate cookie with melted chocolate and crushed candy canes.  It must be Christmas!

Oh, I almost forgot to mention…we had a flashing holiday sweater this year!

Thank you everyone who came and shared in some good food, good conversation and good cookies!  It was lots of fun! 

Happy Holidays and Happy New Year Everyone!

Cookie Exchange 2010 – The Menu

Another successful cookie exchange!

Here is the menu I planned…

Salami Crisps with Sour Cream and Basil

5 Layer Mediterranean Dip

Asiago Cheese Puffs

Cherry Tomatoes with Olive Tapenade

Louisiana Crab Dip with Crudites

Stuffed Mushrooms

Spiced Fig Marmalade & Blue Cheese

As always, I did my best to have a variety of flavors, colors, temperatures and textures.  The Salami Crisps are a recipe from Giada De Laurentiis.  These can be done ahead of time and they do take a little longer to cook than the recipe states.  Be sure to line your baking sheets with parchment or foil to make clean up easier.  Also be sure to get a quality salami.

This 5 layer dip is a much healthier alternative to traditional layered taco dips and is a nice change of pace.  I found this recipe at Athenos.com.  Basically it’s hummus, feta cheese, tomatoes, cucumbers and olives.  I used plain hummus but you could change it up and use a flavored version.  I used kalamata olives, but if you are not a fan any black olive will do.  And it keep it healthy I served it with multi grain chips.

I love tapenade and instead of doing a crostini with tapenade like I usually do I decided to use cherry tomatoes as the base.  I was short on time so I purchased already made olive tapenade from my local grocery store.  While these were tasty, I think you need to really like the kick that olive tapenade has because the tomatoes do not tone down the flavor like bread does. 

I found this crab dip recipe while I was researching menus for a Mardi Gras party.  I decided to try it again.  Typical cream cheese/sour cream dip recipe.  Honestly, this didn’t taste as well as I remembered it.  But I do think the presentation in the fancy glass bowl looked nice.

I also made some basic stuffed mushrooms but I forgot to take a photo.  Sorry.


The fig marmalade was from one of my cookbooks, The Menu by Davis Laris and Dean Brettschneider.  The book has 15 five-course menus.  This is the first recipe I have tried from the book and was quite pleased with it.  The blue cheese complimented the figs nicely and I think the whole grain crostini were a good choice.

While the fig crostini was good I think the hit of the night (besides the cookies of course!) was the Asiago Cheese Puffs.  A mixture of asiago cheese, mayo, onion, thyme and a dash of cayenne on lightly toasted white bread rounds.  I prefer these hot but they can also be served at room temperature.  Check out www.finedinings.com for some more easy gourmet recipes and menus.  The site is pretty ad heavy but the author includes photos of every recipe and you’ll be sure to find something to inspire you. 

And there you have it.  Next up…the cookies!

Thursday, December 30, 2010

Julie's Baby Shower Cake

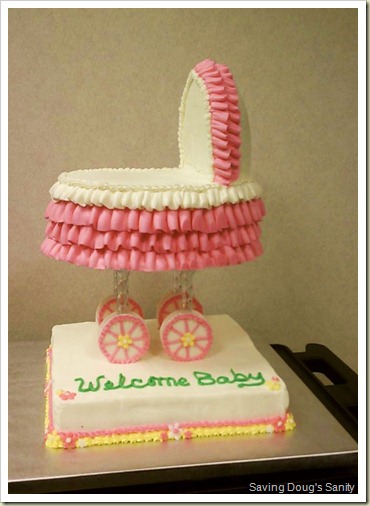
I offered to make a cake for a coworker’s baby shower. There are so many cute baby shower cake ideas out there I struggled with what design to do. Not to mention I had another cake due the day before and we were leaving for a short vacation the day this cake was due. So the design had to be fairly simple. This design is from Wilton, I just changed the colors.

Gumpaste circles were cut out for the wheels a few days ahead so they could dry. I had to special order the crystal plate separators used for legs. The cake consisted of a 12” square cake, an oval cake and ½ of a 3D egg cake. Once the cakes were stacked, I was surprised at how quickly this came together.

The most difficult part was piping the ruffle around the hood of the stroller, just a weird angle to work with. I used a 127 tip for the ruffle around the hood and a 127D tip for the ruffle around the sides. The original design called for only 3 rows of ruffles around the sides but I must have put mine too close together because I needed to add a smaller white ruffle on top.

I added some small flowers on the base cake, and the wheels were decorated and adhered to the legs with buttercream. The stroller was placed on top and it was done.

This cake could not be transported like this, so I just had to remove the stroller and place it in a separate box. I was a little upset that the stroller slid in the box and if you look closely you can see that the ruffles hit the side of the box. Just minor damage though. It happens.

Once I arrived at work I put the stroller back on the legs. The cake was a hit!

20101203 100MEDIA_IMAG0422
Congratulations Julie!

Wednesday, December 29, 2010

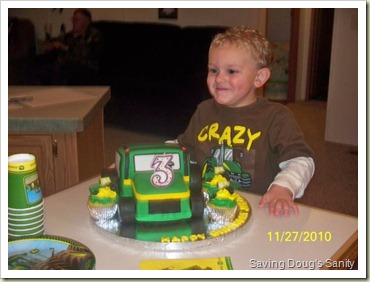
Jacoby's Tractor Cake

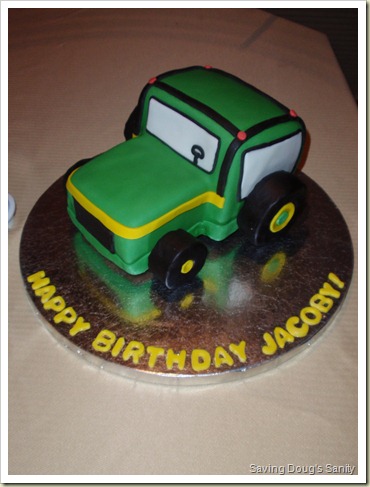
Jacoby wanted a tractor cake for his birthday, you’ll probably recognize the famous green and yellow color scheme. Jacoby’s mom also wanted cupcakes instead of a large cake, she’s a smart lady…much easier for small children. I did a small cake for Jacoby and cupcakes for the rest of the children.

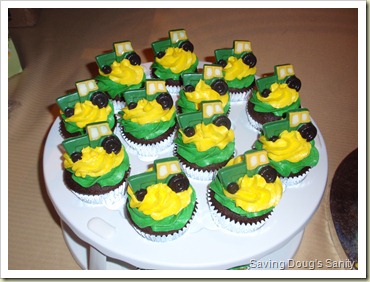
First the cupcakes….Chocolate and vanilla cupcakes with vanilla buttercream tinted green and yellow. They also had a small amount of buttercream filling too. I ordered tractor chocolate molds and spent an afternoon making chocolate tractors. I think they turned out pretty cool! Each cupcake got a tractor.


20101127 PB260209

Jacoby said “Look Mom, the tractors are stuck in the frosting.”  How cute is that?

The cake was a chocolate cake stacked in a tractor shape and covered with green fondant.  I just made a paper template trying to get the proportions to look right.  The wheels were made of rice crispy treats and covered with fondant.  A few fondant details and done!

20101127 PB260210

And this was a wonderful reminder of why I love doing cakes!
20101127 148838_481946189584_539539584_5671676_2824823_n

Happy 3rd Birthday Jacoby!

Tuesday, December 28, 2010

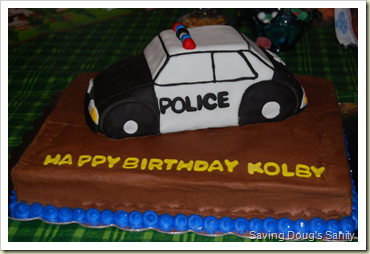
Kolby's Police Car Cake

I seem to get requests for cake cars quite a bit. They can be time consuming but I love the detail and focus they require. Cars for children are usually more playful and abstract while adults are more impressed by realism. Either way I always have to tell myself to “drop the gumpaste tools and walk away!” I could add details to these cakes all night.

This police car was made using the Wilton 3D cruiser cake pan. It is covered with black and white fondant. I didn’t really have a plan for this one; I just decorated while looking at a photo of a police car.

I really wanted to add flashing lights to this cake but my local craft stores did not have wireless LEDs and I did not leave myself time to order them. I guess I should order those after I finishing writing this so next time I’ll have them.

The base cake is an 11 x 15 marble cake with chocolate buttercream.
 
20101208 untitled
Happy Birthday Kolby!

Sunday, November 14, 2010

Bowling for Cake?

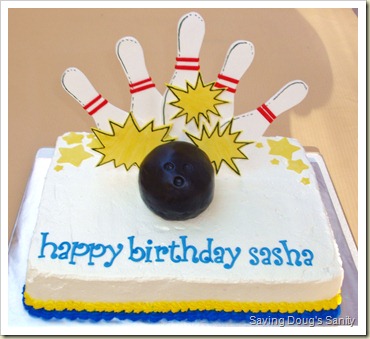
No...Cake for bowling!  Seven year old Sasha was having his birthday party at a bowling alley, so he requested a bowling cake.  This cake was inspired by a design found at CakeCentral.com.

The pins and starbursts are flat cut outs of fondant and glued together.  I used lollipop sticks glued to the back of the pins with melted chocolate to hold up the pins.  The bowling ball was made from rice krispy treats and covered in fondant.

20101114 PB140191

Happy Birthday Sasha!

A whipped cream frosting was requested for this cake.  I did some research and found out you can use gelatin to stabilize whipped cream so it will not melt on your cake.  Although I wasn't able to get the smooth finish like I do with buttercream, I think it worked really well.  I have a leftover test cake in the refrigerator that lasted a whole week and still looks good.  I know, I know, how could I waste cake?!  It actually was a frozen cake that I was experimenting with as well.  Not too crazy about freezing cakes.  I know people do it all the time so I may have to experiment with that some more. 

Stay tuned.  I have a few more cakes over the next few weeks AND my cookie exchange party planning is underway!


Friday, October 15, 2010

The God of Cake

I came across this blog post and just had to share...

The God of Cake

Enjoy!

P.S.  I'm sorry for being MIA lately and I promise to get caught up on posts as soon as possible! 

Sunday, September 12, 2010

Donald Duck

This was a very simple design and I love how it turned out!

20100827 P8270004

Donald was a frozen buttercream transfer (FBCT).  The letters were fondant made using a set of tappits cutters.

Happy Birthday Evan!

Tuesday, September 7, 2010

Chocolate and Peanut Butter Cupcakes!

  I wanted to make some gourmet style cupcakes.  This is what I came up with...

20100905 P9050007
Devil's Food cupcakes filled with Peanut Butter Dream Buttercream.  Frosted with a swirl of Peanut Butter Dream Buttercream and chocolate buttercream.  Topped with a peanut butter candy I made with a candy mold.

Yummy!

Thursday, September 2, 2010

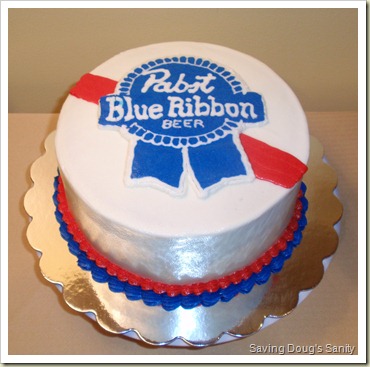
Pabst Blue Ribbon Cake

The request was for a Pabst Blue Ribbon cake.  (And last minute I might add.)  Not much time to think about ideas.  What should I do? 

A beer can cake? No, just not feeling it.

How about trying a frozen buttercream transfer (FBCT for short)?   I think so. 

The concept is pretty simple.  Pipe the buttercream in a reverse image on wax paper.  Freeze.  Frost cake as usual.  Place FBCT on top of cake and peel off wax paper.  Voila!

20100719 P7190099

I added a red stripe on the top of the cake before placing the FBCT.  I cracked the B because the cake was not perfectly smooth I guess.  But after the FBCT thawed I was able to smooth it over and you couldn't even tell!   I think it came out pretty sharp...

and...

I think a found a new favorite technique!  Next time I'll try to take more pictures.

Wednesday, August 25, 2010

The Wedding Cake Chronicle - A Reflection

Remember all those supplies and ingredients?
Can you believe after about 24 hours of baking, decorating and delivering... this is result?
Reflecting back on the experience, here are some of my random thoughts....
  • Dummy cakes are a great way to practice decorating, the fun part!
  • Schedule? Organization is the best plan but be flexible. And unless you have been doing this for a while prepare for things to take twice as long as you think they will.
  • 24 hours is a long time!  This cake basically took over my life for a week!
  • I don't regret doing this cake but I still haven't changed my mind about doing more wedding cakes. :)

Thanks for following 
The Wedding Cake Chronicle,
I hope you enjoyed it!


Monday, August 23, 2010

The Wedding Cake Chronicle - The Feedback

So the wedding cake is done and delivered.  I assume no news is good news.  If there were a problem I'm sure I would have heard right away.  It's difficult to wait for feedback from a wedding cake, I think the cake looked good but you never know what someone else will think of your work.  On Tuesday after the wedding I receive an email from the bride....
I just wanted to let you know how pleased I was with the cake!!! I loved loved loved it! It was exactly what I wanted, not to mention it was delicious!
You do beautiful work. Thank you so much for everything!
OK, now I can feel good.  My only goal is that the bride loves the cake.  Success!

Sunday, August 22, 2010

The Wedding Cake Chronicle - Part 7

Delivery day!

I wake up feeling good.  But still nervous, the venue for the reception is 50 minutes away.  Anything can happen.

I look over the cake and think it looks pretty good. 

Time to get things ready for the delivery.  I put together the shipping boxes.  Put a clean sheet in the back of the SUV and start gathering my last minute materials.

Bows and a piping bag already filled with icing for attaching the bows.  Hopefully this is all I will need, but just in case.....extra fondant and icing, decorating comb, spatula, extra bow, shortening, gum glue, and fondant roller and cutter.

This cake is heavy!  I cannot carry it alone.  Thankfully Doug is helping.  We load the cakes in the SUV at about 11:30am.  Don't forget the camera.  And off we go!

The ride is all highway, but oh my goodness, it is BUMPY!  All I can do is watch my cake jiggle and hope that nothing happens.  I know the support system is stable but it is possible that a crack happens and part of a tier collapses.  There is a little settling of the cake but there really isn't anything I can do about it.

We arrive at the venue at about 12:30pm and I scope out the room and how we are going to get the cake to the room.  I walk into the reception room and it looks beautiful!  All white, very elegant.  I find someone and ask which table is mine.  She points to this very small table right in front of the wedding party table almost in the center of the room.  I say "I don't think that is going to work, I have three cakes"  She looks confused but proceeds to find a larger table for me. 

We have two choices for bringing the cake to the room,  a long sloping ramp or a large set of stairs.  Doug feels he can carry the cake up the stairs, so stairs it is.  We grab a cart and head outside to get the cake.

I don't know if you noticed what I wrote above...the cake table was almost in the center of the room!  Of the four wedding cakes I have done I have never had a cake in the center of the room.  I feel a little nervous because the cakes definitely have a back side.  And this is the side that is facing the bride and the groom!  Had I know this was going to be the layout, I would have placed bows on both sides of the cakes.  But I don't have enough fondant available or extra bows to do this at this time.  Note to self:  ask where the cake will be displayed, even for party cakes.

We set up the three cakes on the larger table and I attach the bows.  I step back and think the overall presentation is beautiful.  I am happy.  Here it is....

My part is done.  We stay in the area for lunch and some shopping.  I keep checking my phone for messages until the 4pm reception time just in case something happened.  No calls, all I can do now is wait for feedback from the bride and groom. 

Best Wishes Tony and Lindsay!

Saturday, August 21, 2010

The Wedding Cake Chronicle - Part 6

Get ready, it's going to be a long day.  Started at 10am this morning.  Leveled, torted and crumb coated the 12", 10" and 8" squares.  Didn't get to the 14" because I forgot to buy cake boards big enough. 

Tried to clean up the bows with shortening but the first one started to crack so I decided to wait.

Stacked the dummy cake I iced yesterday.  I used long wooden skewers to hold the two tiers together.  Not sure if I'm happy with it but we'll see if I have time to redo. 

It's about 1pm and I'm off to the store to pick up some larger cake boards so I can work on the 14".

OK, break time is over.  Had lunch, bought cake boards, and did some cleaning up in the kitchen. 

It's 3pm and time to start with the 14".  Torted and crumb coating done.  For future reference, consider not splitting cakes over 12" just stack two 2" layers.  They are too large and fragile to handle at 1" thick!

Sorry I don't have photos for today, I was behind, stressed, and completely forgot to take photos!

I start icing the cakes.  Based on the dummy cake I previously did I decided to make the icing fairly thin.  Big mistake! 
I spend the next 6 hours...yes i said 6 hours... (with a 1 hour break for dinner) making icing batches and icing the 4 cakes and remaining dummy cake.  I was just trying to get it too perfect.  The OCD in me is making my life miserable! 

I finally realize that once the icing crusts it's best to just leave it alone.  I decide it is a good as I am going to be able get it and move on to stacking. 

Doug was gracious enough to help me stack the cakes.  He has a great eye for centering the cake plates.  For those that don't know, this involves using 4 pillars for each tier, measuring, inserting them in the cake and using a plastic separator plate with feet that fits into the pillars.  The next tier is then placed on the plastic plate.  I try to find the two best sides of each tier and arrange them on the same side of the stacked cake.  I think this cake will definitely have a back side.  It took about 1 hour to stack the cakes.  I also stack the second dummy cake.

It's 10 pm and honestly, now comes the fun part.  The decorating is when the cake starts to come together.  This is when I get into a zone and really don't mind what time it is. But.....

At this point I'm thinking this cake looks like crap!  I refuse to take a photo.  Although I should have to show you how not to freak out at this point.  It WILL get better.

I fill in the gaps between the plates with icing, roll out some fondant and add a 1" strip of purple fondant around the bottom of each tier.  Looks better already!

Next comes the tails of the ribbons.  I roll out some more fondant, cut 2.5" wide strips and place them on the corners of the cakes flowing down the sides.  I wish the cake was fondant so I could place some paper towels under the strips to create more "flowing" but I do the best I can.  Wow, that was pretty close, I only have a small amount of fondant left!

I use shortening to clean up the bows.  They will go on at the venue. 

That's it! 

It doesn't seem like it should have taken that long but it's now 1:22am.  I'm going to bed.  Oh my, my feet and back are so sore!

Good night!

Thursday, August 19, 2010

The Wedding Cake Chronicle - Part 5

So it's Thursday and it's time to get cracking on this to do list.  I'm actually a little (OK a lot) behind where I'd like to be at this point.  But even after a long day at work I'm feeling energized.

I finished all my baking tonight, two 10" vanilla cakes and two 8" strawberry cakes.  Another 3 hours of baking time.   

I also finished bows, which really only consisted of figuring out how I was going to join the two halves together.  Many time the bows lay flat on top of the cake and there is no need to tie them together, but this design calls for the bows to sit vertically on the corner of the cake.  I decide to use a strip of fondant that is wrapped 1.5 times around the center of the bow and glue everything together.


You can see how much the color faded when the fondant dried, the center ties are a little darker because they aren't dry yet.  Once they are dry I will rub them with some shortening to remove the powdered sugar and any small imperfections on the surfaces.  I set them in front of a fan for the night.

Again I attempted to ice a dummy cake.  This one actually turned out OK.  But it took a long time for me to figure out how best to use the decorating comb to get clean lines in the icing.  And I had to realize that EVERY line was NOT going to be perfect.  I hate being a perfectionist!

Tomorrow is crunch time but I'm feeling OK and very glad that I took a vacation day for Friday.  Time to get a good night's sleep.

Wednesday, August 18, 2010

The Wedding Cake Chronicle - Part 4

Started baking at 7pm again tonight. 

Baked a 14" strawberry and found out what happens when you try to to remove the cake from the heating core too soon!


Oh well, it's still enough to plug the cake so I'm ok. 

I also bake a 12" vanilla.  While these are baking I do some cleaning and organizing, but basically I don't make much progress on the rest of the cake. 

I was tentatively planning to take a vacation day from work on Friday in case I'm behind.  At this point I'm thinking I'm in good shape but I'll take the day off to make my life less stressful.  Will it work?

Tuesday, August 17, 2010

The Wedding Cake Chronicle - Part 3

It's Tuesday and I'm already behind...

Home from work at 5:30pm.  Relax for 5 minutes.  Dinner.  Begin baking at 7:15pm.  First up...a 14" square strawberry cake.  This is actually the first time I am using my square pans and a heating core.

The heating core helps the cake bake more evenly and eliminate the dome in the center.  The core is placed in the center of the pan, the batter is poured around it and the core is filled halfway with batter.  After baking you have a cake "plug" to fill the hole where the core was. 


With square corners I always worry about the corners getting dry and/or burnt while the center is still cooking.  Just think about those rock hard brownies from the corner of the pan :)  I must say the heating core worked very well and I am a fan!


I also bake a 12" square vanilla cake.  My oven is only large enough to bake these sizes individually, so it takes about 3 hours to prepare the pans, prepare the batters and bake tonight.

While these two cakes were baking I decided to start on a dummy cake.  I make a batch of icing and begin icing the styrofoam dummies and practicing with the decorating comb.  Being the perfectionist that I am I quickly realize that this will be a practice cake :(  After a few more attempts I decide to clean off the styrofoam and start again tomorrow.  It's 9:30pm and I'm done for tonight.

Monday, August 16, 2010

The Wedding Cake Chronicle - Part 2

OK, it's Monday night and according to plan the following should be done already....

cake platters - check
make bows - um...no excuses...just haven't been in the mood to work with gumpaste
and tonight I should be working on dummy cakes

So I guess I will work on my bows because they need time to dry.  I ordered a 2lb bucket of purple fondant ahead of time because coloring large amounts of fondant can be lots of work.  To start I added 1lb of white gumpaste to 1lb of purple fondant.  The resulting color was actually very close to the swatch I received from the bride.  Fondant colors usually fade slightly as they dry so I figured it would be just right after it dried.

I used the foam dummies to estimate the size of bow I wanted and cut some templates from paper.  The fondant was rolled using my pasta roller attachment on my Kitchen Aid.  It worked beautifully!  Each side of the bow was stuffed with paper towels to keep the shape and allowed to dry.  As usual I made one extra because you never know!


It's hot, it's late, I'm tired and I choose not to work on the dummy cakes.  A mistake?  We'll see....

Wednesday, August 11, 2010

The Wedding Cake Chronicle - Part 1

If you know me you know I like lists.  I have made lists of cake supplies, groceries and a game plan.  And here it all is!


Homemade cake platters (thank you Doug!)
Silver foil to cover the cake platters
4 styrofoam cake dummies
plastic cake separator plates
cake boards
pillars
cake pans
baking strips
heating core
cake release
cooling racks
saran wrap
18 cake mixes
54 eggs
6 cups vegetable oil
raspberry jam (seedless)
14 cups shortening
4 boxes of Dream Whip
30 tsp vanilla
20 lbs of powdered sugar
fondant
gumpaste
pasta roller
gumpaste tools
measuring cups
measuring spoons
scale
spatulas
piping bags
foam roller
turntable
levelers
boxes for transport
saran wrap
and most importantly...
MY GAME PLAN! 

This cake design is a total of 3 tiered cakes.  A center cake:  14", 12", 10" and 8" squares of strawberry cake with vanilla filling and vanilla cake with raspberry jam filling.  Because the bride wanted the look of three cakes but only needed about 200 servings, the two side cakes are actually dummy cakes, styrofoam covered with icing and decorated.  Each cake will have a fondant lilac bow.

Knowing that I have to start baking when I get home from work a game plan is essential.  I don't want to spend time thinking about what I am going to do, I just want to do it.  Here is what my game plan looks like

Weekend before:
   Make cake platters
   Make bows

Monday
   Dummy cakes

Tuesday
   Bake 14" x 2" strawberry
   Bake 12" x 2" vanilla
   Bake 8" x 2" strawberry

Wednesday
   Bake 14" x 2" strawberry
   Bake 12" x 2" vanilla
   Bake 8" x 2" strawberry

Thursday
   Bake 10" x 2" vanilla
   Torte/ice 14" tier with buttercream
   Bake 10" x 2" vanilla
   Torte/ice 12" tier with raspberry

Friday
   Torte/ice 10" tier with raspberry
   Torte/ice 8" tier with buttercream
   Stack
   Add fondant ribbon
   Add bows?

Saturday
   Delivery at 1pm

Chances of staying schedule?  because I am writing this a few days after I know the answer but even so I would have guessed - slim

Tuesday, August 10, 2010

The Wedding Cake Chronicle - Intro

This weekend I will be completing my last wedding cake.  If you read my earlier post, I decided wedding cakes are just too stressful for me as a hobby baker.  But I agreed to this cake earlier this year and I can’t go back on my word.

As I was putting together my game plan for this wedding cake I decided it might be fun(?) to chronicle my activities during the week leading up to the cake delivery.  So if you are thinking about doing a wedding cake and want to see what’s involved (from a hobby baker's perspective), or just want to share in my pain joy, be sure to stay tuned….

Monday, August 9, 2010

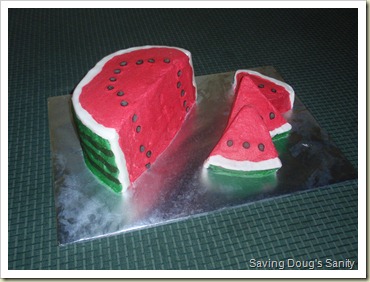
Watermelon Cake

A coworker asked me to make this fun cake, from Woman's Day magazine, for a family picnic.  It was really a last minute request and she needed it for right after we returned from July 4th vacation so I didn't have too much time to think about it.  If I had I would have done it a little differently.

20100707 P7070082

Originally the cake was supposed to be upright on the rounded edge, but the cake and the frosting were just too soft.  The directions said to cut the round cakes in half, stack, then turn on its side.  So that's what I tried to do.  Even though I was wondering what's to stop these layers from separating and falling apart?  Fondant might have worked but I think it was too humid for fondant too.  So the cake ended up as shown.

If I had just thought about it for a moment I would have stacked a rectangular cake and cut the curve out from the bottom.  That way the layers would have been stacked horizontally instead of vertically.  I got caught up in the directions that were presented to me and should have used my experience to look at the cake a design a better solution.  Well, at least now I know not to blindly follow someone else's suggestion without thinking about first.  I guess that's a good lesson for lots of things in life!

In case you are wondering I used chocolate chips for the "seeds".  Again if I had actually looked at some watermelon pictures I may have chosen to pipe those on with frosting but it was a "fun" cake so I'm OK with the chips.

One last thing that hit me while I was trying to fall asleep after making this cake.  Can you guess what it is?

Look closely......

I'll give you a moment....

The stripes on the rind are going the wrong direction!  Apparently none of the guests noticed this either.  Phew!  And here I go pointing it out!  Oh well, nobody's perfect.

I hope you are having a great summer!  Now go enjoy some watermelon...or cake.

Friday, August 6, 2010

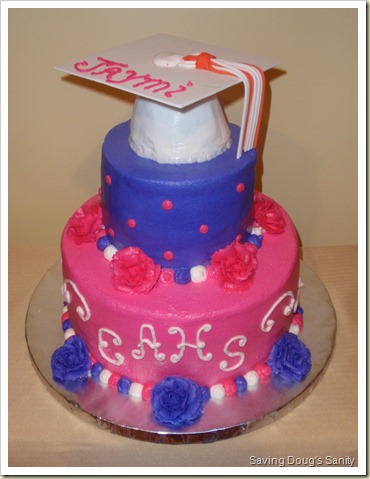
Jaymi's Graduation Cake

Another graduation cake for a co-worker's daughter. 
Bright pink and purple. 

20100716 P7160084

This is a 10" round, a 6" round and a mini wondermold cake with buttercream frosting.  Only the mortarboard and tassel are gumpaste.  So maybe buttercream isn't the right term, icing it a better term because this recipe has no butter.  I had to find a recipe that could handle the crazy heat and humidity we have been having and this is recipe has worked out great!

Roses are still my nemesis.  I wanted to make the roses colored with white edges on the tips but my icing was too soft and the petals fell flat and spread.  So I added sugar to stiffen the frosting but the roses were much harder to pipe.  I had to practice so much that I gave up on the white edges.  I finally got enough roses that I was happy with and called it done. 

Congratulations Jaymi!

Wednesday, July 14, 2010

Danielle's Graduation Cake

A graduation cake for the daughter of a coworker. 

20100625 P6250130

Danielle was pretty specific about what she wanted.  The base cake was chocolate and the top tier was vanilla, both with hot pink vanilla filling.  As I was filling this one with the hot pink frosting I thought "girly cakes are fun to do!"  Both are covered with hot pink fondant.  (Note to self...wear gloves next time I color fondant pink.  I had pink fingernails for a few days!)

The balls are rolled fondant.  I made the graduation cap and diploma out of gumpaste earlier in the week so they would have time to dry.  You can't really see it in the photo but the tassel was made out of fondant using my new clay extruder.  What a neat tool!

Danielle was a cheerleader, the paw prints represent the "Home of the Wildcats".

Danielle was so happy with her cake she sent me a thank you note!  Thanks Danielle, you made my day!

Monday, July 12, 2010

Surprise!

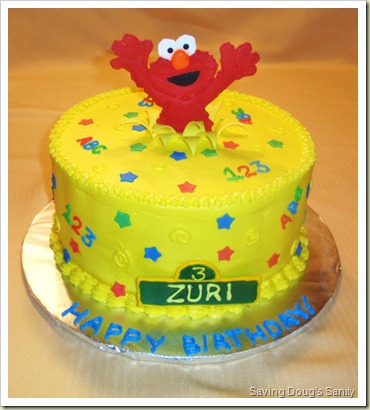
When I saw this design on cakecentral.com I thought it was the cutest thing ever.  So when a co-worker asked if I could do Elmo I showed her a photo and she said it was perfect.

Pre work consisted of cutting out small fondant stars and curled fondant triangles, and making a color flow Elmo and street sign (see previous post).  The ABCs, 123s  and swirls were piped with buttercream.  Elmo was on two lollipop sticks so it was easy to insert him into the cake.  The fondant curls were just placed into the buttercream.  Of course the cake was chocolate with chocolate buttercream filling, what could be better for 3 year olds?

20100617 P6170126
Happy Birthday Zuri!

This cake was fun and a well needed therapy session after my last wedding cake :)

Sunday, July 11, 2010

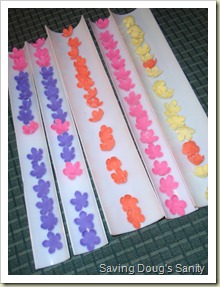
Color flow

Color flow icing can be used to make detailed icing decorations for cakes.  It is sugar, water and a little color flow mix.  The design is piped onto a sheet of wax or parchment paper and allowed to dry.  The result is a puffy looking flat candy plaque.  It is edible but is very hard and sweet.

You can start with any simple design, coloring book photos work well.  I outlined this picture, taped it to a baking tray and then covered with parchment paper.  I made the color flow icing.  The outside of the design is traced with a stiff version of the icing to create a dam to hold in the icing from the next step.  Then water is added to the icing to make it more easily "flow" and fill in the outline.  Here I have filled in the eyes and nose and outlined the body.
P6140099

Then I filled in the body.
P6140100

These have to dry for a few days before they are hard enough to handle.  Once dried I added two lollipop sticks to the back with melted chocolate so I could insert into the cake.

Stay tuned for the finished cake....

Thursday, June 24, 2010

Why I won’t be doing any more wedding cakes

I have already agreed to do one more wedding cake this August, but after that no more! Wedding cakes are a big deal. I don’t want to be responsible for ruining a bride’s wedding day with a cake disaster. Don’t get me wrong, I don’t think the success of a wedding depends on the cake, but on her special day a bride may think so. And pictures preserve that memory forever! Honestly, I don’t even remember what my wedding cake looked like. And even if it was bad, I probably wouldn’t have known the difference. OK, maybe I would have, but only if it was really bad.

I believe most cake decorators will tell you, they truly care how their cakes turn out. For the recipient AND for themselves. Successful cake decorators want to make the perfect cake for you and they take pride in showing their work. Cake decorating should be fun! And for me it usually is…except for wedding cakes. I’m sure if this was my full time job and I had more experience doing large scale cakes I might feel differently. But it’s just too stressful right now.

After I finished the daisy wedding cake Doug asked me “Did you enjoy making that cake?” I said yes, but I'm not so sure.  In a way I did. I enjoy the process of making and decorating cakes. I enjoy creating something from nothing and being proud of it. But the perfectionist in me was very frustrated with the heat, the melting buttercream and the cracking fondant. The worrier in me couldn’t sleep all night and the 90 minute drive just about did me in! I was desperately trying to figure out a way to get out of doing the next wedding cake in August! When I finally received feedback (a few days later) that everyone loved the wedding cake, it was like a huge weight was lifted from my shoulders. I imagine it’s just like most stressful situations, when you are in the middle of it it’s not so good, but when it’s all done you look back and say that wasn’t so bad. The end result makes up for the painful journey. But I have to wonder if that journey was really worth it.

What solidified my feelings on this was the next cake I did. A children’s birthday cake. It was fun! The entire cake, from start to finish. No worries, no stress! Isn’t that what a hobby is supposed to be like? YES! And that is what I need to remember, this is a hobby, not a job. If a hobby isn’t fun then why do it?

So after the one wedding cake that I have already committed to in August, no more wedding cakes for me. I’m starting my game plan now, so hopefully it can go as smoothly as possible. Who knows I may change my mind in the future but for now I’m sticking to birthdays, graduations, baby showers, holidays, just for fun cakes, etc. Anything but weddings.

Thanks for listening.

Sunday, June 20, 2010

Donations for Community Days

Our local Community Days was held last weekend. A friend of mine asked if I would donate a cake for the cake wheel. Sure, why not? A chance to try a design that I have been waiting for an excuse to make.

I decided I was going to try to make a cookie monster cake. I have seen designs where cookie monster is made from a teddy bear mold and he sits on top of a cake with chocolate chip cookies surrounding him. It’s really very cute. But I need a back up plan in case this doesn’t work, so I decide to make some small flowers.

P6060097
Poor planning on my part because Community Days is the same weekend as a wedding cake is due. Luckily the smaller cake can be done for Friday and the wedding is Sunday. No rest for the weary! And I’m not sure why but I decide to make two cakes….the flower cake AND the cookie monster cake.

I am sorry to say that cookie monster was not looking like cookie monster, so I had to abandon that idea. Although I will try that design again when I have some free time. And now I have an extra cake, what to do?

Here are the two designs I came up with….

20100611 P6110082
A 4-layer 6" round chocolate cake with chocolate buttercream.

And....
20100611 P6110085
A 2-layer 8" round yellow cake with chocolate and vanilla buttercream.

Friday, June 18, 2010

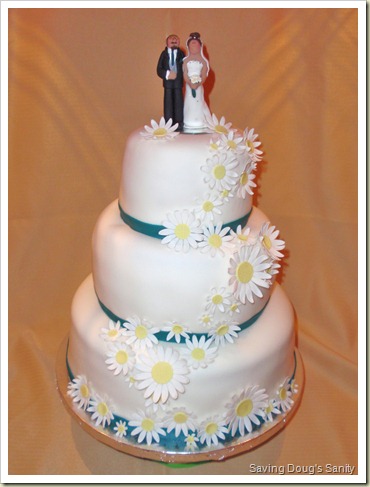
Daisy Wedding Cake

Wow, all I can say is I’m glad that’s over! Saturday was WAAAAY too hot and humid to be putting together a wedding cake in a non-air conditioned home. Yes, a few things were my fault but this was THE most stressful cake I have done. First of all I should not have agreed to donate a cake for our local Community Days event on the same weekend. And I don’t end up donating one cake but TWO! But that’s a story for another time.

As you saw the daisies were complete a week early, thank goodness. All I had to do was bake the cake, fill the layers, frost with buttercream, cover with fondant and add the flowers. Sounds simple right?

I finished baking the cakes Friday night. The last set of cakes, 2 9-inch rounds calls for 5 ½ cups of batter each. I know one white cake mix recipe makes 4 cups of batter. So I make 3 batches all together for 12 cups and figure if I split them the extra ½ cup in each should be OK. The pans don’t look overfull as I put them into the oven. After about 15-20 minutes I smell it! One of the pans has overflowed and is dripping all over the heating element and bottom of my oven. Great. I’ll admit it has happened before, my fault. I throw a cookie sheet under the cakes and continue to let them cook. Shortly thereafter I check on the cakes and THERE’S A FIRE IN MY OVEN! And I mean flames! The batter that had dripped on the bottom of my oven caught on fire. So I take everything out, use some metal tongs to try to break up the spill and put out the fire. At this point it’s 10:30 Friday night. The cakes go back in and finish cooking around 11pm.

Saturday morning, Doug goes into work and I start leveling, filling and crumb coating my cakes. I level the 9” cakes first and taste the part I remove. Thankfully it does NOT taste burnt at all and I don’t have to rebake. It wasn’t the cake itself that burnt but I wasn’t sure if the fire would have added any off taste to the cakes. By 11am I have finished the 6”, 9” and 12” rounds and a 9”x13” kitchen cake. I decide to put the cakes in the refrigerator and save the fondant and decorating until at least dinner time, when it will (hopefully) be cooler.

About 5pm I decide I should get started again. I set up a huge fan blowing into the kitchen and get started rolling out the fondant. Let’s start with the 12” and work down from there. The fondant cracks on the cake and I cannot repair it to save my life. I remove the fondant to reroll and try again but it is SO hot and humid that the buttercream sticks to the fondant and not the cake. I refrost the cake, put it back into the refrigerator, and run to the store for another box of fondant. I already have two but if things keep going the way they are I better make sure I have enough.

OK, back from the store. This time I start with the 9”….perfect! The 12”… again… Perfect! The 6”…OK a small crack at the top edge of the cake. Try to fix, shortening, glycerine, powdered sugar, ARGH! I remove the fondant to start again and of course all the buttercream comes off. Refrost and try again. This time there is a small section of “elephant skin” but it’s OK. Going back and trying to smooth the fondant with SOFT frosting underneath is not the easiest thing to do (my fault). Now I know, STIFF frosting when the weather is warm.

Not that it was anywhere near this quick, but I stacked the cakes, added a teal border along the bottom of each tier and started adding daisies. I am always amazed at the difference it makes when I start adding the decorations. Some fussing here and there and the daisies are done. And I only broke 7 in the process. I see a daisy cake for someone in the near future because I have so many left. I take some photos and I’m done for the night.

It’s 10pm and I know where my cake is. It’s in the much cooler finished basement where it spends the night before the 90 minute drive in the morning. Normally my cakes go into the refrigerator at night so the frosting can firm up and the cake is more stable for transport, but fondant doesn’t like the moist refrigerator and it will sweat after being removed from the cold refrigerator. So all I could do was hope the basement was cool enough to keep everything in place.

Couldn’t sleep all night. I just knew the small section of elephant skin on the top edge was going to crack under the weight of itself and I would wake up to half of the top tier on the floor. The cake gods must have been smiling down on me because, luckily, that did not happen. There was a small crack on the top edge but it was not progressing and it was situated at the back of the cake, so hopefully it would be OK.

I pack up EVERYTHING I could possible need to repair most cake mishaps during transport, except extra cake. We load the cake in the car and we are off. What would I do without Doug? That is one heavy cake!

I am nauseas the entire trip. What will I do if something happens? How will I fix it? 90 minutes, who’s crazy idea was it to agree to delivery 90 minutes away? I know that the way I put the cake together it is very stable. And if something does happen it would likely be fixable. But this is someone’s wedding! I can’t give them a messed up cake! This stress is killing me.

Finally we make it to the venue and set up the cake. I am happy with the way it looks.

One thing I don’t like about weddings is that I just drop off the cake before the event and never get to see the bride and grooms reaction. A few days later the father of the bride tells me “It was perfect. It looked beautiful and was delicious too!” Couldn’t have asked for a better ending.

20100612 P6120088

Congratulations Liz and Chris!

Sunday, June 6, 2010

Daisies, Daisies, Everywhere!

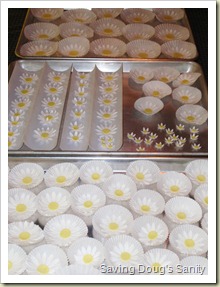
Spent the day making daisies....
I should have plenty for my wedding cake next weekend, but I always make extra because you just never know what might happen!

Daisy 2

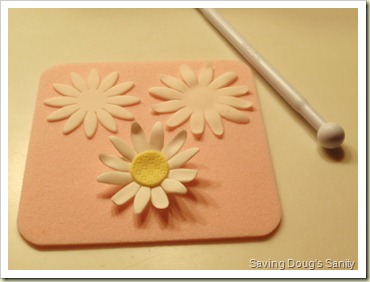
The process is really quite simple.  Roll out the 50:50 gumpaste fondant mixture very thin.  Cut out flowers with a cutter (top left), use a ball tool to thin and curl the petals (top right).  After drying for a few hours in a flower former, I used mostly baking cups here, I added a small yellow fondant center (bottom).   The pattern was impressed with a fine cheese grater.  

Daisy 1

Why use flower formers, you ask?   Have you ever seen a totally flat flower?  This gives the flowers a little more realism.

Stay tuned for the finished wedding cake!

Wednesday, May 26, 2010

Not your typical cake design....

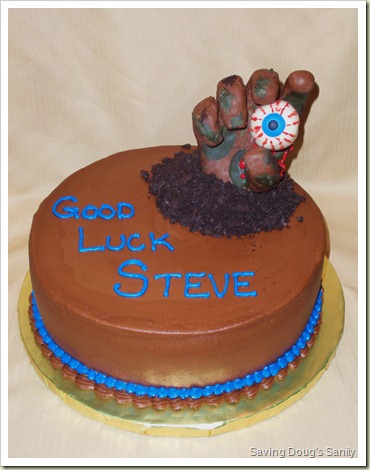
One of my colleagues, Steve, was leaving the company and I wanted to make a cake to wish him luck in his new adventures. Hmmm…what should I do? Well, he loves zombie movies. OK. No particular zombie movies come to my mind immediately, so I start searching for zombie cakes….

The “traditional” zombie cake photos that I found were mostly of tombstones with heads and arms crawling out of the grave. I didn’t need a large cake and I wasn’t real comfortable with trying to make a head and face, even if it would be a zombie! I found one cake that was a pink decorated birthday cake with a zombie hand breaking through the cake and decided that was they way I wanted to go. I just changed it up a little but kept the idea, a nicely decorated cake with a zombie hand coming out of the cake…and my zombie hand would be holding an eyeball!

For this trick I decided to try modeling chocolate. I was pleasantly surprised at how easy modeling chocolate was to make and work with. Unfortunately I forgot to take photos while I made the chocolate. It basically works like modeling clay. Once you work it a bit it becomes soft and malleable. Then you can sculpt or carve as necessary. It hardens again by placing it in the refrigerator.

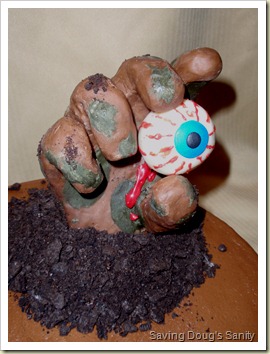
As suggested by a fellow cake decorator I decided to use rice krispy treats covered with modeling chocolate instead of solid chocolate, purely for weight concerns. I made what looked like a baseball mitt out of rice krispies. The fingers were just too hard to do with this medium. After this “dried” for a few days I started covering with modeling chocolate. I added fingers and was able to add small pieces at a time and smooth the entire surface. I didn’t really worry about it being perfect, it was supposed to be a zombie hand. This is what the hand looked like at this point.
0511100745a (2)

I was debating on other colors to add to the hand for effect. Should I use modeling chocolate or edible paint? I decided to add some green modeling chocolate, going for the moldy, rotten look. I new the hand would be coming out of the cake surrounded by a pile of crushed cookies for dirt so I brushed on small amounts of piping gel (so it would be sticky) and sprinkled with cookie crumbs.

On to the eyeball… solid white modeling chocolate smoothed into a ball. Used a small piece of fondant for the iris/pupil and painted on blood vessels with melted red chocolate.

Next the cake... it was 4 layers of chocolate cake, with strawberry jam filling, covered with chocolate buttercream.

I placed a small cake circle (cardboard) at the base of the hand and inserted two wooden skewers through both to support the hand. I then inserted the skewers into the cake, of course adding buttercream under the circle to “adhere”. I piped a mound of buttercream around the hand and covered with crushed cookies.

I was careful to keep the rest of the cake neat, but Doug said it was too neat of a pile; it should have been more messy like the hand actually broke through. OK, I get that, but executing that is a lot harder than it sounds. I think it turned out great!

I added the eyeball and some melted red chocolate on the hand for blood dripping from the eyeball. Done!

20100513 P5130096

Here is a close up of the hand...

P5130082

Best of luck Steve!
It was a pleasure working with you!

Wednesday, May 19, 2010

This was supposed to be quick and easy...

A simple 2 layer cake for a 90th birthday party.  Nothing fancy, so we decided just flat flowers.  OK, baked and filled the cake, no problems.  Frosted the cake, no problems.  Unless of course you count the fact that a 10x14 board is a little tight for a 9x13 cake.  I'll have to remember that next time. 

Added reverse shell border on top, no problems.  Wait, must have placed border just over the edge....as I'm working on the flowers I notice part of the border on the back is falling off!  I carefully remove and re-pipe a new border in that section and put the cake in the refrigerator hoping the buttercream will stiffen enough to hold everything in place. 

30 minutes later....border looks OK.  Onto the flowers.  Should be easy, use a cookie cutter to "mark" the shape of the flower in the buttercream then outline and fill with simple stars.  Yeah, easy.  I had to use the medium size cutter because the cake was only 9x13 and after filling in with stars they looked like big blobs!  Deep breath...scrape off the frosting...new plan.  Move onto the lettering.

I practice on paper about 10 times trying to keep the 90 centered and why can't happy and birthday have the same number of letters?!  In the end I think it looks ok.  If only she hadn't drawn me a picture of the cake then I wouldn't have felt obligated to put the words at a slant like that.  At first my 9 looks like a g.  Happy goth birthday, great!  Scrape, scrape...9 with a straight line, check.  Time to walk away.

30 minutes later...new idea for the flowers.  I'll pipe circles for each petal and flatten slightly, then add a center circle.  Are they the best flowers I've made?  No but I'm out of ideas and once I add the vines, leaves and small flowers on the sides I'm comfortable with the way it looks.


Serves me right for thinking I could go out for dinner after work, come home and easily put this cake together in an hour or so.  As far as cake decorating goes these are minor problems but after a long day, when it's 10pm, they seem a little bigger than they actually are, and it's easy to get stressed.  I've learned when I'm getting frustrated it's best to just walk away, take a break and come back fresh in 15 or 30 minutes.  And always plan for your plan to change!


Monday, May 17, 2010

Why I love making cakes...


This is Carter, and his mom was lucky enough to have the camera in hand and catch the moment when he first saw the camo cake I made for his birthday.  Need I say more?!

Sunday, May 16, 2010

How I made a camouflage cake, inside and out!

First came the request for a camouflage cake for a young boy who loves the outdoors, only one requirement...no fondant.  Next came the internet search and of course, a search on Cake Central where I get most of my inspirations!  There were many great design ideas and then I decided to take it to the next level and make the cake itself camouflage! 

First, I mixed a white cake mix (dyed green), a chocolate cake mix and a yellow cake mix, separately.  After preparing my pans I spooned a little of each batter in random spots until I had the proper amount of batter in each pan.  I did not swirl the batters.  I then baked and cooled the cakes as usual.


Here is a photo of the inside of the cake as I split to fill with chocolate frosting.

Pretty cool, huh?

Next I crumb coated each cake and stacked.  This is a 4" high 6" round cake stacked off center on a 2" high 10" round cake off center.  The only reason I crumb coated was to "seal in"  the chocolate crumbs.  I don't really think this step is necessary, the camo design will cover the entire surface.


Next step was to mix the buttercream colors.  I chose buttercup yellow with a little brown, moss green, and plain vanilla and chocolate buttercream.  Now I know these are not technically camo colors but I didn't want the cake to be all drab colors.  I filled my piping bags and started piping randoms blobs and lines all over the cake. 


The cake went into the refrigerator to firm up and crust.  After about 20 minutes I removed the cake and started to roll the surface with a 4" high density foam roller, the Melvira method.  I couldn't beleive my eyes, it was actually working!  (You can see on the bottom tier where I started rolling before I remembered I needed to take a photo.)   I continued to smooth out the surface and added a few plastic figures.  

The finished cake...
Happy Birthday Carter!

Here is a photo of the inside of the cake after cutting...


I can see using this for different occasions, for example, school colors and holiday colors.  The design pretty much stayed in place as I rolled the surface so this may even work for something like stripes in buttercream.  Hmmm, I'll have to try that.